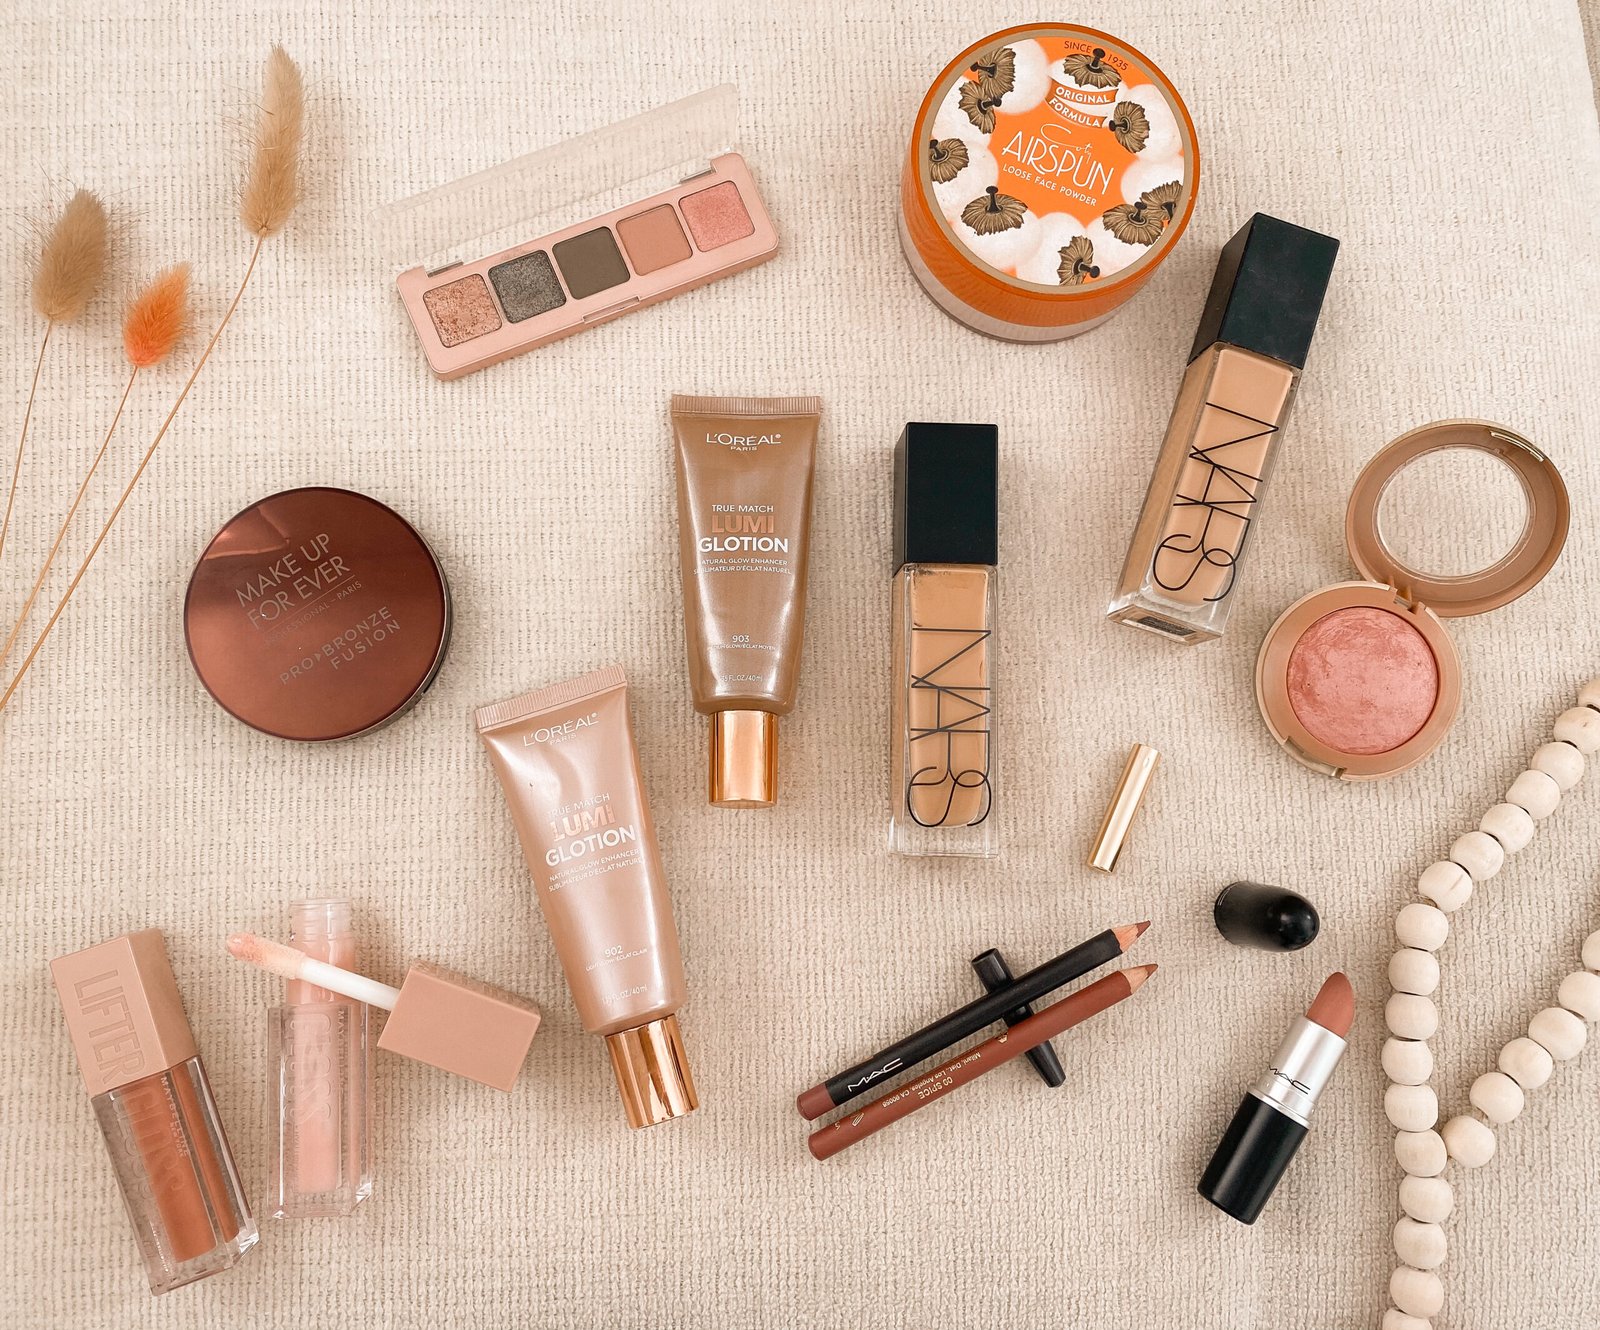
Simple make-up steps for beginners, to achieve the perfect look!
Table of Contents:
- Step 1: Skin Hydration
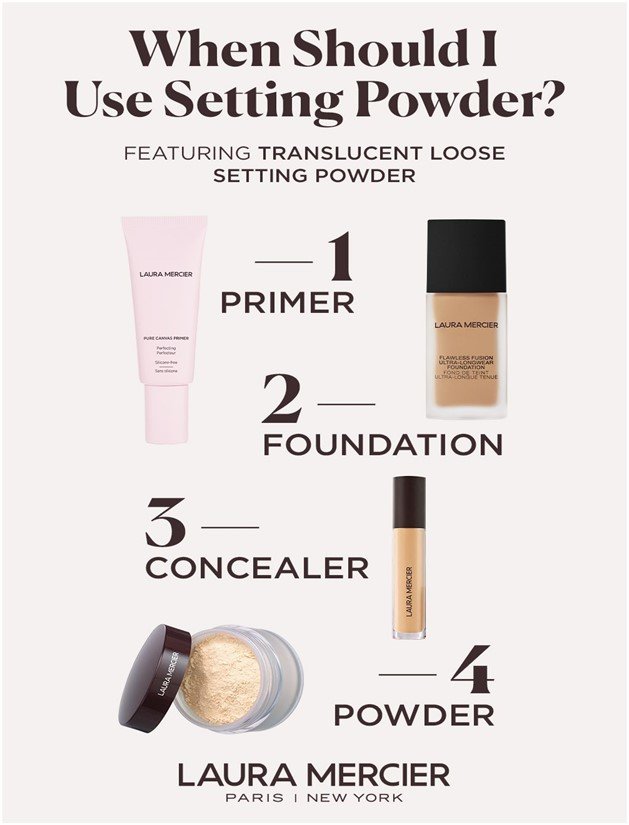
- Step 2: Primer
- Step 3: Brows and Eyes
- Step 4: Foundation
- Step 5: Concealer
- Step 6: Bronze, Brush and Highlight
- Step 7: Translucent Powder and Setting Spray
- Step 8: Lips
Do you all ever watch makeup tutorials and imagine yourself flaunting the same look? Despite the makeup steps looking easy to follow, I can bet you they are not!
Our skin types are divided into different categories; oily, combination, dry, and sensitive therefore, not every makeup will suit every skin type. But worry not cause you have landed just on the right spot!
After all my research, and trial and error I am here to guide you all. From taking you step-by-step through everything to even suggesting the most suitable makeup products for you, we will be talking about it all to help you achieve the perfect makeup routine.
Makeup has different meanings for all of us. For some, it is a tool for self-expression while for others it is used to hide their flaws. But no matter what significance it has for you, the most important step that you cannot miss before beginning your makeup is:
STEP 1: SKIN HYDRATION
Only a smooth canvas will result in a perfect picture. Thus, hydrating your skin is the most important cause you do not want your skin to look flaky or your makeup to start peeling off.
Regardless of your skin type, hydration is the key! Many of us believe that oily skin does not necessarily need to be moisturized which is not true at all. No matter what our skin type is, keeping it hydrated is essential.
Here is a list of some of The Best Moisturizers for All Skin Types.
STEP 2: PRIMER
Although a lot people are going to tell you that primer is optional, DO NOT BELIEVE THEM! A good primer can do wonders for your skin especially if you struggle with open pores.
There are several kinds of primers available out there that have different benefits to offer. If you are an oily skin girly then you can benefit from the long-lasting, oil-reducing qualities of a primer.
Moreover, primers are made to make your skin appear luminous and hydrated while hydrating your foundation’s glow-boosting effects.
Find The Best Primer for Your Skin Type here.
STEP 3: BROWS AND EYES
Well, a lot of you might not agree with me here but don’t you think cleaning up under the eyes without disrupting the concealer or foundation would be so much better than having to re-do it after cleaning up?
This step would eliminate the mess of fixing fallouts; however, it also depends on the type of makeup you are going for. For instance, if it is about an eye look then doing this step first is better otherwise you can directly move on to the skin.
Find The Best Eye-shadow Palettes here.
STEP 4: FOUNDATION
Moving on to the main step of your entire makeup look. Now again, your foundation selection depends firstly on your skin type and the kind of makeup look you are going for. Whether you want full coverage, light coverage, matte finish, or dewy finish etc.
A bonus tip is to always find a foundation that is the closest match to your skin tone to avoid looking like a clown.
There are plenty of foundation options available in the market, but let me list down my personal favorites.
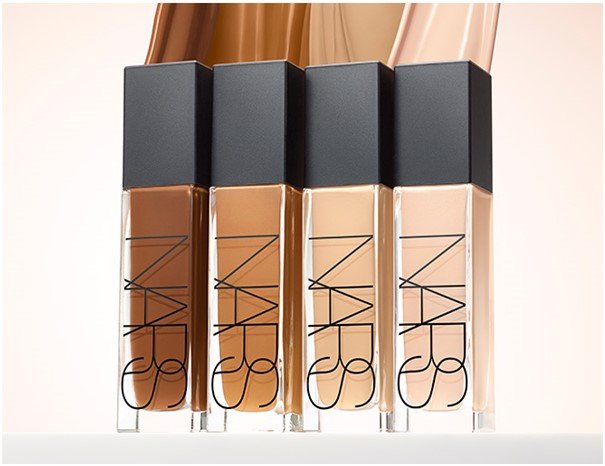
1. NARS Cosmetics Natural Radiant Longwear Foundation
Pros:
-
It gives a very natural-looking finish that leaves the skin looking radiant and healthy
-
It is a long-wear foundation and can last up to 16 hours
-
Has buildable coverage
Cons:
-
Due to its natural radiant finish, it can be slightly dewy for oily skin types
-
It is a bit pricey
Click here to buy it now.
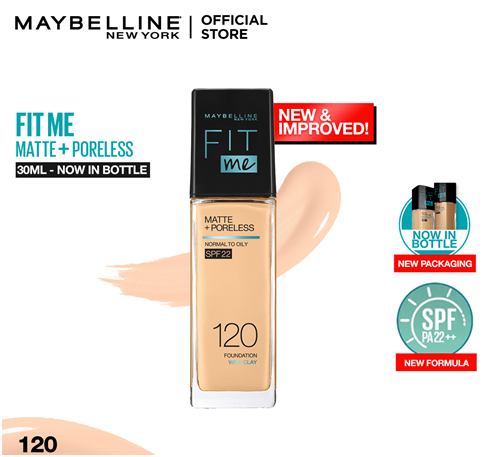
2. Maybelline Fit Me Foundation
Pros:
-
It is easy to blend and gives you a light to medium coverage
-
It has a non-comedogenic formula
-
Perfect choice for everyday wear
Cons:
-
Not suitable if you prefer a heavy coverage foundation
-
Can be slightly drying on some skin types
-
Does not control oil unlike some other foundations
Click here to buy now.

3. Armani Luminous Silk Foundation
Pros:
-
Gives a beautiful dewy, natural looking look without looking greasy
-
It is light weight and buildable
-
It is oil-free and non-comedogenic
Cons:
-
It is light to medium coverage, so for those looking for full coverage it is not for you
-
It is a luxury foundation, hence, it is expensive
Click here to buy now.
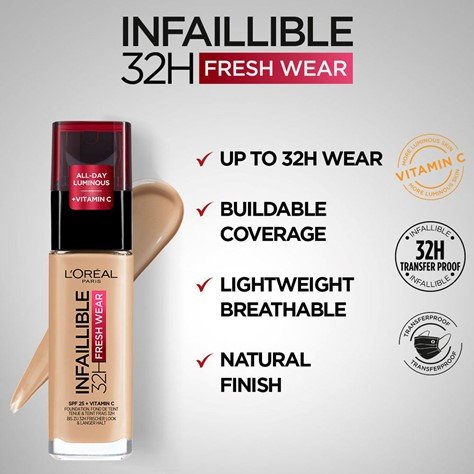
4. L’OREAL Infallible 24hr Fresh wear Liquid Foundation
Pros:
-
It is long-lasting and gives a satin finish
-
Has buildable coverage
-
You have a large shade range to choose from
-
It is a budget-friendly option as compared to all high-end foundations
Cons:
-
It may not be suitable for those with oily skin
-
It can emphasize the dry patches on your skin if your skin is not well-prepped
-
Although it has a wide shade range, those with darker skin tones may still find it difficult to find their perfect shade
Click here to buy now.
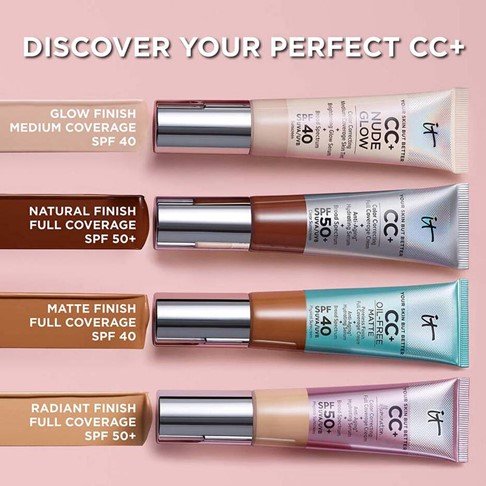
5. IT Cosmetics CC+ Cream with SPF50
Pros:
-
Has a hydrating formula which is beneficial for your skin
-
It provides medium to buildable coverage
-
Contains SPF 50+ which makes it perfect for daily wear as well
-
Also comes in a wide shade range
Cons:
-
It may be a bit pricey compared to some other drugstore options
-
Some people might find its fragrance too strong
-
The coverage might not be enough for those with oily skin or blemishes, you might need a separate concealer
Click here to buy now.
TIP: How to Find the Perfect Foundation Shade?
STEP 5: CONCEALER
You can tell by the name what role concealer has to play in your makeup routine. Just like foundation, concealers also come in different varieties, with two key distinctions being coverage and brightening.
Coverage vs Brightening Concealer
Here is how both of these differ from each other:
-
Coverage Concealer
This type of concealer aims at hiding any imperfections on your face. Usually these are highly pigmented offering a full to medium coverage in order to completely conceal dark circles, blemishes, hyper pigmentation.
-
Brightening Concealer
Whereas this type of concealer aims to highlight specific areas of your face, particularly under eyes. Since the purpose is to highlight therefore it offers a sheer to light coverage having light reflective properties to create a brightening effect.
Here is a table for better understanding:
|
FEATURE |
COVERAGE CONCEALER |
BRIGHTENING CONCEALER |
| Focus | To hide imperfections | To brighten specific areas |
| Pigmentation | High (medium to full coverage) | Light (sheer to light coverage) |
| Formula | Creamy, liquid, stick (can be matte or hydrating) | Lightweight, dewy/radiant finish |
| Application | Directly applied on imperfections | Applied on the under eye area, blend outwards |
Find The Best Concealers of 2024 here.
STEP 6: BRONZE, BLUSH AND/OR HIGHLIGHT
After completing all the previous steps to even out your skin with complexion products, here comes the fun part. In this step you add a pop of color to your cheeks, give yourself a bit of contouring with bronze, and highlight the high points of your face.
A bonus tip for you is to wet your beauty blender with your setting spray and then apply your highlighter with it for a more radiant glow.
STEP 7: TRANSLUCENT POWDER AND SETTING SPRAY
Setting your face with powder after applying liquid products is very important to help them remain on your skin for a longer period of time. Additionally, if you want your makeup to last even longer then consider spritzing on some setting spray as well.
STEP 8: LIPS
Here comes the last step without which your makeup can never be complete. Again, the lip you choose to wear whether it is matte, gloss, dark, light, etc depends on your overall look especially if you are heavy on the eyes.
This is the perfect 8-step makeup routine for anybody who is new to using makeup.
FIVE ADDITIONAL STEPS:
Now, let’s walk you through 5 additional steps that can make your makeup look even better.
-
KNOWING YOUR TOOLS
Before you start working on the canvas, it is extremely important to familiarize yourself with the tools that you will be using or needing.
To make it easier for you let us have a quick overview of the different types of makeup brushes:
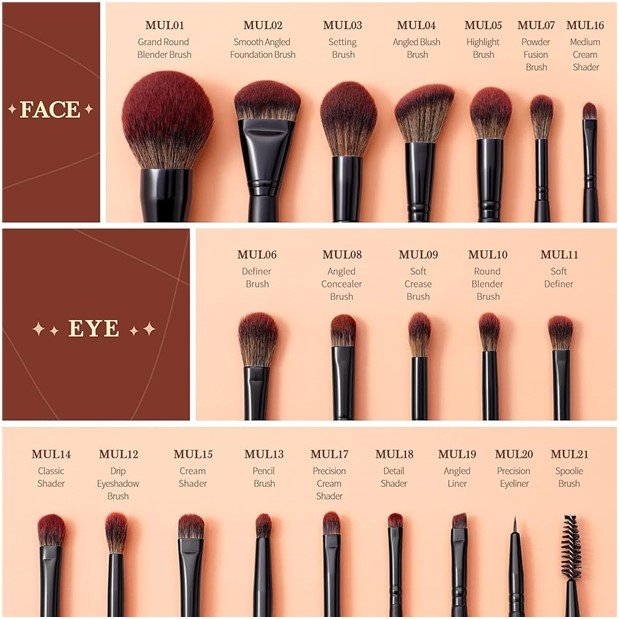
-
KNOWING THE BASIC TECHNIQUES
After you are familiar with the tools, next comes the simple techniques you must be aware of to make achieving the desired look easier for you.
-
PRACTICE WITH SIMPLE LOOKS
Now after you have acquired the basic knowledge about the makeup tools and some basic tips and tricks then comes the time where you need to start implementing it.
You can start practicing simple looks such as:
Daytime look – which is all about natural beauty.
Evening look – this can be a bit dramatic if compared to the daytime look.
Natural or No-makeup look – now this look is all about enhancing one’s natural beauty.
You may not be able to achieve the desired look in the first attempt but always remember that consistency is the key!
-
EXPLORE THE DIFFERENT MAKEUP TRENDS
After you have mastered the basic looks, you can always step out of your comfort zone and explore more trends.
This will help you in broadening your skills and also help you in creating your own unique and creative looks.
-
KEEP PRACTICING AND EXPERIMENTING
Lastly, never stop practicing and experimenting! Nothing is ever enough, there are always new styles and trends coming in. Keep in mind that your growth depends on your practice.
Just like every other thing, the world of makeup is always evolving. Keep yourself updated with these trends, you may read blogs, watch tutorials etc.
So, do not be afraid, grab your tools and start experimenting now!